 Adam Schuman
You're a guitar enthusiast looking to customize your sound. Why not build your own pedalboard?
You'll choose the material, secure your pedals, select the perfect power supply, and learn how to eliminate unwanted noise.
Plus, you'll master cable management for a sleek look.
It's cost-effective and rewarding.
Let's dive into creating a DIY guitar pedalboard that hits all the right notes!
Choosing Materials
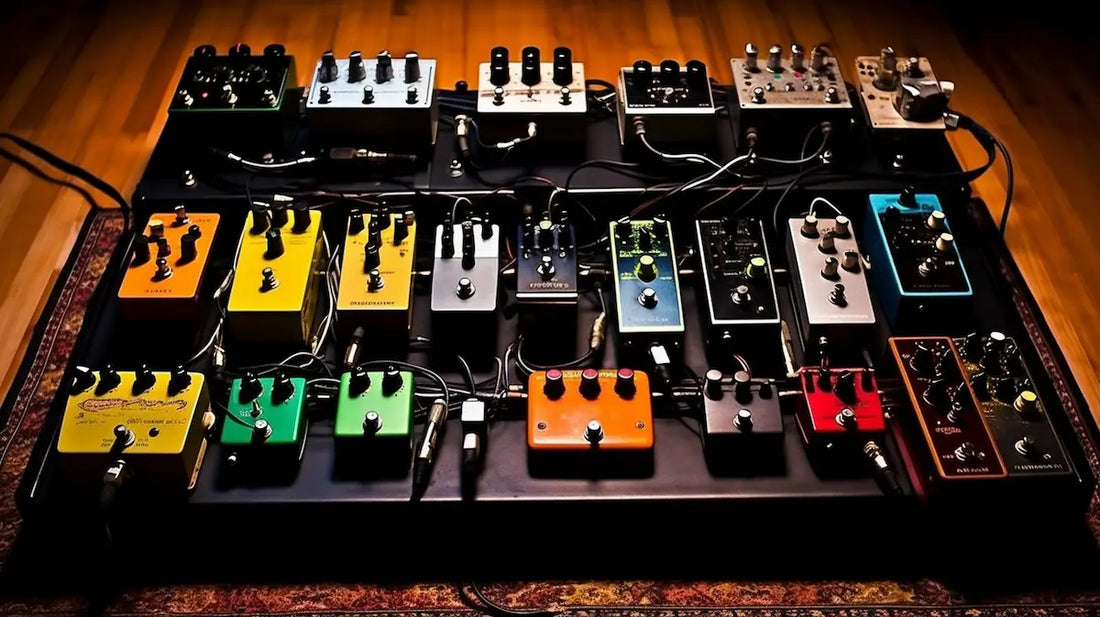
When you're deciding on materials for your DIY pedalboard, remember you've got options like plywood, pegboard, plastic, or even repurposing an old pedalboard (maybe a buddy is getting rid an old pedaltrain chassis).
Plywood is a popular choice due to its availability and ease of customization. It's sturdy and can be cut to any size, making it an excellent canvas for personalization ideas.
Pegboard, on the other hand, offers built-in cable management with its pre-drilled holes. It's lightweight but durable enough to hold your pedals securely. Some folks will attach the pegboard to plywood for extra support.
Plastic is sturdy and is easy to work with. You can cut it to size, and the surface of plastic works really well with velcro and dual lock.
If you're seeking a more unique look or want to save money, consider repurposing an old suitcase or piece of furniture as a case for the pedalboard. This approach adds character and is a cost effective option.
Whichever material you choose will influence your building techniques and overall design layout. Remember that this project is about creating something that fits your needs and reflects who you are as a musician.

Attaching Pedals
You'll want to use industrial strength Velcro or dual lock for secure pedal placement. It's essential in maintaining a stable and efficient pedalboard layout. By securing pedals onto your board, you reduce the risk of them slipping or falling off, especially during live performances.
Always remember to place your most frequently used pedals at the front row for easy access. It's all part of smart pedalboard organization. Then, arrange the rest based on signal flow order from right to left. Typically it goes like this: tuner, wah and filter effects; modulation effects like chorus and flanger; then overdrives and distortions; delay and reverb last. I should mention that some guitarists prefer the delay before overdrives and distortions because they like the idea of notes getting lower gain for each repeat. Ultimately, there is no wrong way to arrange your pedals..... as long as you like the sound and where everything is positioned.
Lastly, don't be afraid to experiment with your setup. Your pedalboard is an extension of you as a musician - make sure it fits your playing style perfectly.
Power Supply Selection
In selecting a power supply for your pedals, it's crucial to invest in a quality one with isolated outputs. This feature eliminates noise and offers more reliability, keeping your sound clean and uninterrupted. Some top-notch power supply brands include Voodoo Lab, Truetone, and Strymon. They're well-regarded for their durability and performance.
Consider power supply features when making your choice. Look for options like voltage selection switches or sag controls that allow you to adjust the output voltage. You'll also want to ensure the unit fits comfortably on your pedalboard without taking up too much space.
Based on these considerations, my power supply recommendations would be the Voodoo Lab Pedal Power 2 Plus for its versatility or the Strymon Zuma for its high current outputs. Remember, investing in quality now can save you headaches later!

Eliminating Noise
To keep your sound crisp and clear, it's crucial that you avoid running power cables parallel to your audio cables as this can cause interference. Grounding techniques play a vital role in eliminating noise from your pedalboard. Proper grounding ensures an uninterrupted signal flow and prevents unwanted hum or buzz. Alway avoid running power cables alongside instrument cables... That can induce hum. Try to position your pedal power cables perpendicular to the patch cables, and don't position your 18' instrument cable too close to your power cables.
Good shielding provides another layer of protection against noise interference. Quality shields block electromagnetic fields which could interfere with your signal- so DON'T BUY CHEAP CABLES!!!
Your source of power for your pedalboard makes a big difference. Ever play at that one dive bar in the middle of nowhere that was wired (poorly) in the early 1930's? I hate to break it to you, but it's probably gonna be noisy. I always make sure my amp and pedalboard are plugged into the same outlet. If two outlets are not grounded to the same spot, this can cause noise.
Incorporate these strategies into your DIY pedalboard project for best results.

Customization and Cable Management
Now that we've covered eliminating noise, let's dive into customization options and cable management for your pedalboard.
Your personalized design is a reflection of you. Choose materials that speak to your style; perhaps plywood painted in vibrant hues, or a vintage suitcase for a retro vibe. Exploring creative options like these not only makes your board unique but also adds personality.
Now, onto cable organization: it's not just about aesthetics - it impacts sound quality too. Run power cables perpendicular to guitar cables to minimize interference and maintain cleaner sound. Utilize zip ties or adhesive blocks through pegboard holes for neat arrangement.

DIY Your Own Guitar Pedalboard
Crafting your own guitar pedalboard can be a rewarding project. You've got the freedom to choose materials, attach pedals securely, and select a reliable power supply.
With careful cable management, you'll minimize noise and keep things tidy.
Remember to size your board according to your needs and leave space for a mounted power supply.
If in doubt, professional help is available from Danville Music.
Enjoy creating a personalized setup that rocks!


Trending Posts
Recent Posts
Boutique Electric Guitars: Hidden Gems!
January 31, 2024